PlaneLocket's Cookbook

Menu
  • Home
  • Homesteading
    • Soaps
    • Herbs ‘n Remedies
    • Canning
    • Fermenting
    • Cultured Dairy
    • Brews
    • Gardening
      • Looper’s Garden Calendar (5B)
  • Recipes
    • Main Dishes
    • Pastas
    • Breads
    • Soups ‘n Stews
    • Sammiches
    • Sauces, Spices ‘n Extracts
    • Sides ‘n Salads
    • My Sweetnesses
    • Breakfast & Brunch
    • Appetizers & Snacks
    • Drinks
    • Pets
  • Feeling Adventurous
Menu

Category: Uncategorized

Parmesan

Posted on January 20, 2023January 20, 2023 by looper
Prevent your screen from going dark

Parmesan

A Parmesan-style cheese made from fresh milk with thermophilic culture, lipase, and rennet. The curds are cooked, pressed, brined, and aged to develop a firm texture and concentrated flavor.
Print Recipe
Course Cultured Dairy
Cuisine Italian
Status Tried & True

Equipment

  • Large pot
  • Thermometer
  • Long knife (curd knife; does not need to be sharp)
  • Cheesecloth (2 pieces)
  • Cheese press
  • Wire whisk

Ingredients
  

  • 2 gallons fresh milk from cows goats, or both
  • 1/4 tsp. lipase powder dissolved in 1/4 cup cool water and allowed to set for 20 minutes (optional)
  • 1 packet direct-set thermophilic culture use 1/8 tsp. if using bulk packet
  • Rennet choose one:
  • 1/2 tsp. liquid animal rennet dissolved in 1/2 cup cool water
  • 1/4 tsp. double-strength liquid vegetable rennet
  • 1/4 vegetable rennet tablet dissolved in 1/2 cup cool water
  • 2 Lbs. sea salt non-iodized or cheese salt
  • 1 gallon water
  • Olive oil

Instructions
 

  • Heat the milk to 87°F. Add the thermophilic culture and lipase, and stir well. Cover and allow to ferment for 45 minutes.
  • Check temperature and make sure milk is no warmer than 90°F. Stir to homogenize the milk, and slowly incorporate the diluted rennet using an up-and-down motion with your spoon to ensure that the rennet works its way through all the milk, so you can get the highest possible yield.
  • Allow the cheese to set for 30 to 45 minutes at 90°F, or until the whey begins to separate from the curd. You should see a layer of mostly clear whey floating on top of the curd, and the curd should be pulling away from the sides of your pot. If you use lipase, this may take a little longer.
  • Using a long knife, cut the curds into 1/4-inch cubes.
  • Stir the curd with a whisk, slicing it into small pieces. The pieces should all be roughly the same size.
  • Over the next 25 minutes, slowly heat the curds to 100°F, stirring frequently with your wooden spoon. As you stir, the curds will shrink.
  • Slowly heat the curds to 125°F, stirring to prevent matting. The curds should be small, and if you bite one it should squeak in your teeth. When they have reached 125°F, turn off the heat and allow the curds to rest for 5 minutes.
  • Pour the curds into a press lined with cheesecloth, and press at 5 pounds of pressure for 15 minutes.
  • Using a fresh piece of cheesecloth, flip the cheese and press, again, at 10 pounds of pressure for 30 minutes.
  • Repeat this process again, at 15 pounds of pressure for 2 hours, rinsing your cheesecloth in clean, cool water each time and hanging to dry.
  • Finally, press at 20 pounds of pressure for 12 hours, or overnight.
  • Mix 2 Lbs.of sea salt with 1 gallon of cold water to make a brine. Place the cheese in the brine and let it soak for 24 hours.
  • Take the cheese out of the brine and age at 55° to 60°F for at least 8 months. (Click here for practical methods for aging cheese.) Coat the cheese daily with olive or coconut oil, and if mold appears wipe it off with a clean cloth dipped in salt water or vinegar.
Keyword cheese
Tried this recipe?Let us know how it was!
Paneer

Posted on January 20, 2023January 20, 2023 by looper
Prevent your screen from going dark

Paneer

Fresh paneer made from whole milk curdled with citric acid and drained into a firm cheese. It can be salted to taste and pressed to the desired texture.
Print Recipe
Course Cultured Dairy
Cuisine Indian
Status Tried & True

Equipment

  • Stainless steel pot
  • 6 quart or larger
  • Dairy thermometer
  • Slotted spoon
  • Large colander
  • Butter muslin
  • Measuring cup & spoons

Ingredients
  

  • 1 Gallon whole milk*
  • 1 tsp Citric acid
  • Salt optional

Instructions
 

  • Heat Milk Pour the milk into the pot and heat to 185–194°F (85-90°C) on a stove top or in a sink surrounded by hot water. If using a stove, stir the milk while it heats slowly. Once heated, hold the temperature for 20–30 minutes.
  • Prepare Citric Acid Add 1 tsp. citric acid to 16 oz. of 170°F (76°C) water.
  • Add Citric Acid Cool milk down to 170°F (76°C), then slowly add in the citric acid mixture while gently stirring the milk.
  • Curds Continue stirring the milk until you see a separation of curds and whey (solids and liquid). Stop stirring and let the curds and whey sit undisturbed for 20–30 minutes.
  • Prepare the Colander While the milk is sitting line the sterilized colander with the butter muslin and place it in a sink, large pot, or within a bowl to catch the whey.
  • Removing Whey Begin by ladling out the whey into the muslin. Then pour the remaining curd into the muslin. (Removing the whey first allows for better drainage.)
  • Draining Allow the curds to drain for 30 minutes. Giving a gentle stir helps the whey drain off.
  • Pressing: Part One Once the curds are well drained, the muslin can be pulled up and tied off. Allow this to drain a few minutes before opening the cloth. You will begin to see much drier curds and the early Paneer that is still quite crumbly.
  • Pressing: Part Two Retie the muslin, pulling it tightly around the curd mass. Place the tied off ball of curds in the colander and then a plate over the curd mass. Place a pot with about 1–2 gallons of warm water on top of the plate and allow the curd to be pressed for 10–15 minutes. The plate helps disperse the weight more evenly. The amount of weight and time for pressing will depend on how dry and compact you want your final Paneer to be.
  • Storing Fresh Paneer won’t last long in the fridge, so make sure you use it within a few days. Many people think that because the milk has been heated to such a high temperature that it’s stable for long storage. This is not true. It can be refrigerated for 4–7 days with no salting or 1–2 weeks if lightly salted and packed in an airtight package.
Keyword cheese, paneer
Tried this recipe?Let us know how it was!
Ricotta

Posted on January 20, 2023January 20, 2023 by looper
Prevent your screen from going dark

Ricotta

Fresh homemade ricotta made by gently heating whole milk and curdling it with lemon juice. The curds are drained and lightly salted for a soft, creamy cheese.
Print Recipe
Course Cultured Dairy
Cuisine Italian
Status Tried & True

Equipment

  • 4-quart pot
  • Instant read thermometer or candy thermometer
  • Measuring spoons
  • Cheese cloth
  • Strainer
  • Mixing bowl
  • Slotted spoon

Ingredients
  

  • 1/2 gallon whole milk not UHT pasteurized (see Recipe Notes)
  • 1/3 cup lemon juice from 1 1/2 to 2 lemons or 1/3 cup distilled white vinegar or 1/2 teaspoon citric acid
  • 1 teaspoon salt optional

Instructions
 

  • Warm the milk to 200°F: Pour the milk into a 4-quart pot and set it over medium heat. Let it warm gradually to 200°F, monitoring the temperature with an instant read thermometer. The milk will get foamy and start to steam; remove it from heat if it starts to boil.
  • Add the lemon juice and salt: Remove the milk from heat. Pour in the lemon juice or vinegar (or citric acid) and the salt. Stir gently to combine.
  • Let the milk sit for 10 minutes: Let the pot of milk sit undisturbed for 10 minutes. After this time, the milk should have separated into clumps of milky white curds and thin, watery, yellow-colored whey — dip your slotted spoon into the mix to check. If you still see a lot of un-separated milk, add another tablespoon of lemon juice or vinegar and wait a few more minutes.
  • Strain the curds: Set a strainer over a bowl and line the strainer with cheese cloth. Scoop the big curds out of the pot with a slotted spoon and transfer them to the strainer. Pour the remaining curds and the whey through the strainer.
  • Removing the big curds first helps keep them from splashing and making a mess as you pour.)
  • Drain the curds for 10 to 60 minutes: Let the ricotta drain for 10 to 60 minutes, depending on how wet or dry you prefer your ricotta. If the ricotta becomes too dry, you can also stir some of the whey back in before using or storing it.
  • Use or store the ricotta: Fresh ricotta can be used right away or refrigerated in an airtight container for up to a week.

Notes

Whole vs. 2% vs. Non-Fat Milk: While whole milk is our favorite for making
ricotta, 2% milk can also be used, though the ricotta is slightly less rich and
creamy. Avoid using skim and nonfat milks; these don’t separate as easily
into curds and whey.
Keyword cheese, ricotta
Tried this recipe?Let us know how it was!

Concord Grape Jelly

Posted on January 20, 2023January 20, 2023 by looper
Prevent your screen from going dark

Concord Grape Jelly

Classic Concord grape jelly made from fresh grapes, sugar, and liquid pectin. The grapes are cooked and strained before the juice is turned into a smooth, sweet preserve.
Print Recipe
Course Preserves
Status Tried & True

Ingredients
  

  • 3 1/2 pounds Concord grapes
  • 1/2 cup water
  • 7 cups white sugar
  • 6 fluid ounce container liquid pectin

Instructions
 

  • Sort and wash grapes, and remove stems. Place them into a large kettle and crush them. Add water, cover, and bring to a boil over high heat. Reduce heat to low, and simmer for 10 minutes. Remove from heat, and extract juice. Allow the juice to stand in a cool place overnight to prevent the formation of crystals in the jelly.
  • Strain the juice through a double thickness of damp cheesecloth. Measure 4 cups of the juice into a large pot. Stir in the sugar. Quickly bring to a full rolling boil. Stir in pectin, and allow to boil hard for 1 minute. Remove from heat, and skim off foam. Pour into hot sterile jars, and process for 5 minutes in a boiling water bath.
Keyword canning-jams-jellies, jelly
Tried this recipe?Let us know how it was!

Jalapeno Jelly

Posted on January 20, 2023 by looper
Prevent your screen from going dark

Jalapeno Jelly

Sweet and spicy jalapeño jelly made with fresh jalapeños, cider vinegar, sugar, and pectin. It cooks into a bright pepper jelly with a balance of heat and sweetness.
Print Recipe
Course Preserves
Status Tried & True
Servings 5 half-pints
Calories 975 kcal

Equipment

  • 5 Ball® (8 oz) half pint glass preserving jars with lids and bands

Ingredients
  

  • 12 oz jalapeño peppers about 12 med
  • 2 cups cider vinegar divided
  • 6 cups sugar
  • 6 oz Liquid Pectin
  • Green food coloring optional

Instructions
 

  • Prepare boiling water canner. Heat jars in simmering water until ready for use. Do not boil. Wash lids in warm soapy water and set bands aside.
  • PURÉE peppers in food processor or blender with 1 cup cider vinegar until smooth. Do not strain purée.
  • COMBINE purée with remaining 1 cup cider vinegar and sugar. Bring to a boil over high heat. Boil 10 minutes, stirring frequently.
  • ADD Ball® RealFruitTM Liquid Pectin, immediately squeezing entire contents from pouches. Continue to boil hard for 1 minute, stirring constantly. Remove from heat. Add food coloring, if using, and skim foam if necessary.
  • LADLE hot jalapeno jelly into hot jars leaving 1/4 inch headspace. Wipe rim. Center lid on jar. Apply band until fit is fingertip tight.
  • PROCESS in a boiling water canner for 10 minutes, adjusting for altitude. Remove jars and cool. Check lids for seal after 24 hours. Lid should not flex up and down when center is pressed.

Nutrition

Calories: 975kcalCarbohydrates: 247gProtein: 1gFat: 1gSaturated Fat: 0.03gPolyunsaturated Fat: 0.2gMonounsaturated Fat: 0.02gSodium: 13mgPotassium: 294mgFiber: 2gSugar: 244gVitamin A: 648IUVitamin C: 98mgCalcium: 19mgIron: 1mg
Keyword canning-jams-jellies, jelly
Tried this recipe?Let us know how it was!

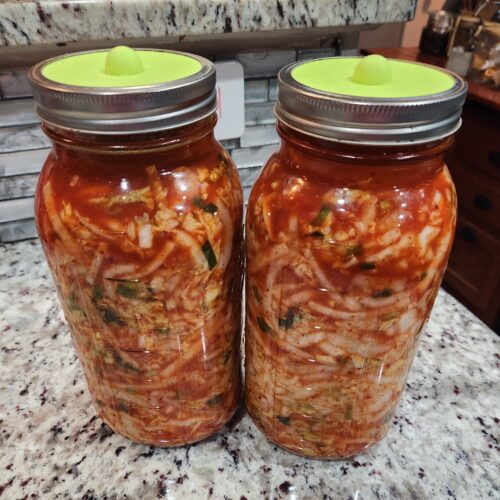
Cabbage Kimchi

Posted on January 20, 2023January 31, 2023 by looper
Prevent your screen from going dark

Cabbage Kimchi

Homemade cabbage kimchi made with napa cabbage, garlic, ginger, fish sauce, sugar, and red pepper flakes. The seasoned cabbage is packed into a jar and fermented for a tangy, spicy result.
Print Recipe Pin Recipe
Prep Time 45 minutes mins
Course Preserves
Cuisine Korean
Status Tried & True
Servings 16
Calories 17 kcal

Equipment

  • Cutting board and knife
  • Large bowl
  • Gloves (optional but highly recommended)
  • Plate and something to weigh the kimchi down, like a jar or can of beans
  • Colander
  • Clean 1-quart jar with canning lid or plastic lid
  • Bowl or plate to place under jar during fermentation

Ingredients
  

  • 1 napa cabbage about 2 pounds
  • 1/4 cup kosher salt
  • Water
  • 1 tablespoon garlic grated
  • 1 teaspoon ginger fresh, grated, peeled
  • 1 teaspoon granulated sugar
  • 2 tablespoon fish sauce or 3 tablespoons water
  • 1 to 5 tablespoons red pepper flakes gochugaru
  • 8 ounces daikon radish peeled and cut into matchsticks
  • 4 scallions medium, trimmed and cut into 1-inch pieces

Instructions
 

  • Cut the cabbage. Cut the cabbage lengthwise through the stem into quarters. Cut the cores from each piece. Cut each quarter crosswise into 2-inch-wide strips.
  • Salt the cabbage. Place the cabbage in a large bowl and sprinkle with the salt. Using your hands, massage the salt into the cabbage until it starts to soften a bit. Add enough water to cover the cabbage. Put a plate on top of the cabbage and weigh it down with something heavy, like a jar or can of beans. Let stand for 1 to 2 hours.
  • Rinse and drain the cabbage. Rinse the cabbage under cold water 3 times. Set aside to drain in a colander for 15 to 20 minutes. Meanwhile, make the spice paste.
  • Make the spice paste. Rinse and dry the bowl you used for salting. Add the garlic, ginger, sugar, and fish sauce, shrimp paste, or water and stir into a smooth paste. Stir in the gochugaru, using 1 tablespoon for mild and up to 5 tablespoons for spicy (I like about 3 1/2 tablespoons); set aside until the cabbage is ready.
  • Combine the vegetables and spice paste. Gently squeeze any remaining water from the cabbage and add it to the spice paste. Add the radish and scallions.
  • Mix thoroughly. Using your hands, gently work the paste into the vegetables until they are thoroughly coated. The gloves are optional here but highly recommended to protect your hands from stings, stains, and smells!
  • Pack the kimchi into the jar. Pack the kimchi into a 1-quart jar. Press down on the kimchi until the brine (the liquid that comes out) rises to cover the vegetables, leaving at least 1 inch of space at the top. Seal the jar.
  • Let it ferment for 1 to 5 days. Place a bowl or plate under the jar to help catch any overflow. Let the jar stand at cool room temperature, out of direct sunlight, for 1 to 5 days. You may see bubbles inside the jar and brine may seep out of the lid.
  • Check it daily and refrigerate when ready. Check the kimchi once a day, opening the jar and pressing down on the vegetables with a clean finger or spoon to keep them submerged under the brine. (This also releases gases produced during fermentation.) Taste a little at this point, too! When the kimchi tastes ripe enough for your liking, transfer the jar to the refrigerator. You may eat it right away, but it’s best after another week or two.

Notes

Salt: Use salt that is free of iodine and anti-caking agents, which can inhibit fermentation.
Water: Chlorinated water can inhibit fermentation, so use spring, distilled, or filtered water if you can.
Storage: Kimchi can be refrigerated for up to a few months. Use clean utensils each time to extract the kimchi from the jar.

Nutrition

Calories: 17kcalCarbohydrates: 3gProtein: 1gFat: 0.2gSaturated Fat: 0.04gPolyunsaturated Fat: 0.1gMonounsaturated Fat: 0.03gSodium: 1962mgPotassium: 193mgFiber: 1gSugar: 2gVitamin A: 357IUVitamin C: 19mgCalcium: 54mgIron: 0.4mg
Keyword fermenting-vegetables, kimchi
Tried this recipe?Let us know how it was!

Homemade organic raw apple cider vinegar

Posted on January 20, 2023January 31, 2023 by looper
Prevent your screen from going dark

Homemade Apple Cider Vinegar

Homemade organic raw apple cider vinegar
Print Recipe
Course Condiment
Status Tried & True

Ingredients
  

  • 3 small apples core and peel included, no stem
  • 3 tsp raw sugar
  • filtered water to cover

Instructions
 

  • Wash and chop your apples into medium sized pieces (or use the peels and cores of 6-7 small apples after making a pie). Place them in a clean, rinsed and sterilized wide mouth jar.
  • Mix the sugar with 1 cup of water and pour on top of the apples.
  • Add more water if needed to cover the apples.
  • Cover the jar with a paper towel or a cheesecloth and secure it with a band. This keeps nasties away while letting the liquid breathe.
  • Place the jar in a warm, dark place for 2-3 weeks.
  • Strain out the liquid and discard the apple pieces.
  • Return the liquid to the same jar and cover it again (same paper or cheesecloth).
  • Return the jar to the same warm, dark place and leave it do its thing for roughly 4 to 6 weeks, stirring with a plastic or wooden spoon every few days or so.
  • After the first 4 weeks, you can begin to also taste your vinegar and once it reaches an acidity you like, you can actually transfer it to a bottle with a lid and begin using it.
Keyword cider, fermenting-seasonings
Tried this recipe?Let us know how it was!

Homemade Ginger Ale

Posted on January 20, 2023 by looper
Prevent your screen from going dark

Homemade Ginger Ale

Naturally fermented homemade ginger ale flavored with fresh ginger, cane sugar, molasses, citrus juice, and a ginger bug. The mixture ferments into a lightly fizzy, spicy-sweet drink.
Print Recipe
Course Beverage
Status Tried & True
Calories 438 kcal

Ingredients
  

  • 4 tbsp ginger grated, fresh
  • 1/2 cup cane sugar organic
  • 1 teaspoon molasses organic
  • 1/4 teaspoon sea salt
  • 3 tablespoons lemon juice fresh squeezed
  • 1/2 cup ginger bug
  • 7 cups water non-chlorinated

Instructions
 

  • Add 3 cups of water, ginger, sugar, molasses and sea salt to a saucepan.
  • Bring to a boil and then simmer for 5 – 10 minutes.
  • Remove from the heat and add 4 cups of water. Cool to room temperature.
  • Transfer to a 1/2 gallon glass container with lid.
  • Add lemon or lime juice, and ginger bug. Stir.
  • Put lid on jar and tighten.
  • Allow to ferment on counter for 2 – 6 days. (Shorter time period if room is warm and longer time period if room is cold.)
  • Once bubbling begins, burp the jar by loosening the lid and then re-tighten.
  • Strain and bottle in Grolsch bottles and refrigerate. Will last for several months. Check the bottles occasionally and burp the lid to prevent too much build-up of gases

Nutrition

Calories: 438kcalCarbohydrates: 113gProtein: 1gFat: 1gSaturated Fat: 0.1gPolyunsaturated Fat: 0.1gMonounsaturated Fat: 0.04gSodium: 672mgPotassium: 267mgFiber: 1gSugar: 107gVitamin A: 3IUVitamin C: 19mgCalcium: 73mgIron: 1mg
Keyword ginger
Tried this recipe?Let us know how it was!

Ginger Bug

Posted on January 20, 2023January 20, 2023 by looper
Prevent your screen from going dark

Ginger Bug

A ginger bug is a natural ferment that can be used as a starter culture for homemade sodas, ginger ale, or root beer.
Print Recipe
Course Beverage
Status Tried & True

Ingredients
  

  • 3 tablespoons grated or finely chopped organic ginger root
  • ½ cup sugar
  • 2 cups water
  • Plus: Additional sugar and ginger for feeding

Instructions
 

  • Place the ginger, sugar, and water in a quart-size wide-mouth mason jar and shake gently to dissolve the sugar.
  • Cover the jar with cheesecloth or a coffee filter and a lid ring or rubber band and set the jar in a warm spot to ferment.
  • Every day for the next week, add one tablespoon each of finely chopped (or grated) ginger and sugar to “feed” the ginger bug. Toward the end of the week you should notice some bubbly action in the jar and you may notice a faint yeast smell. These are all signs that fermentation is happening as it should! If you do not notice any bubbly action after a week, or if mold forms on the surface, you may need to start again.
  • Once bubbles have formed at the top of the ginger bug, it is ready for use in your homemade soda recipe. Pour off the amount that you need for the soda recipe, and replenish the ginger bug for future use.
  • To keep the ginger bug alive, feed it daily as above. If you will not be using the ginger bug for a while, you can store it in a refrigerator and feed it once a week. When you are ready to use your ginger bug again, place it in a room temperature location and resume feeding it daily.
Keyword ginger
Tried this recipe?Let us know how it was!

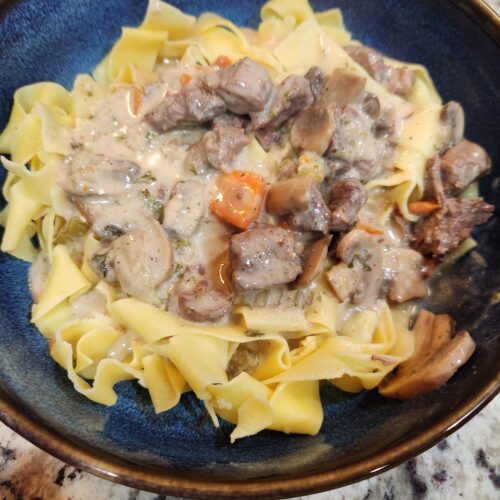
Pressure Cooker Beef Stroganoff

Posted on January 20, 2023 by looper
Prevent your screen from going dark

Pressure Cooker Beef Stroganoff

This beef stroganoff uses lean beef chuck for a high-protein feast.
Print Recipe Pin Recipe
Course Main Course
Cuisine American
Status Tried & True
Servings 6
Calories 527 kcal

Equipment

  • 1 Instant Pot

Ingredients
  

  • 1 1/2 pounds beef chuck roast cut into 1-inch cubes
  • Kosher salt and freshly ground black pepper
  • 1 tablespoon olive oil
  • 1 ea onion medium, chopped
  • 1 cup dry white wine
  • 1 tablespoon Dijon mustard
  • 1 tablespoon all-purpose flour
  • 1 cup beef broth low-sodium
  • 1 pound white button mushrooms whole
  • 3 ea carrots cut into 1/2-inch chunks
  • 2 ea stalks celery chopped
  • 1/4 cup neufchatel cheese
  • 1/4 cup parsley roughly chopped, fresh
  • 12 ounces egg noodles

Instructions
 

  • Toss the beef with 1/2 teaspoon each salt and pepper. Heat the oil in a pressure cooker over medium-high heat. Add the beef and cook, stirring occasionally, until browned on all sides, about 4 minutes. Add the onions and cook, stirring frequently, until the onions soften and begin to brown, about 4 minutes. Add the white wine, mustard and flour, bring to a simmer and cook until reduced by half, about 2 minutes. Add the beef broth, mushrooms, carrots and celery.
  • Secure the pressure cooker lid and bring to high pressure over medium heat. Once at high pressure, cook for 18 minutes. Remove from the heat and, using the quick-release valve, carefully open. Stir in the neufchatel, parsley and salt and pepper to taste.
  • Meanwhile, bring a pot of water to a boil and cook the egg noodles according to package directions. Drain and keep warm.
  • Divide the noodles and beef stroganoff evenly among 6 serving bowls.

Nutrition

Calories: 527kcalCarbohydrates: 46gProtein: 34gFat: 21gSaturated Fat: 8gPolyunsaturated Fat: 2gMonounsaturated Fat: 10gTrans Fat: 1gCholesterol: 133mgSodium: 321mgPotassium: 842mgFiber: 3gSugar: 3gVitamin A: 430IUVitamin C: 5mgCalcium: 64mgIron: 4mg
Keyword InstantPot, main-dishes-meat
Tried this recipe?Let us know how it was!
  • Previous
  • 1
  • …
  • 28
  • 29
  • 30
  • 31
  • 32
  • 33
  • Next

Recent Posts

  • PlaneLocket Brown-Butter Oatmeal Raisin Cookies
  • Homemade Peanut Butter Dog Treats
  • Summer Solstice Sun Tea
  • Creamy Mushroom Barley
  • Making Mead the Roman Way

Recent Comments

No comments to show.

Archives

  • September 2026
  • August 2026
  • July 2026
  • November 2025
  • October 2025
  • September 2025
  • June 2025
  • May 2025
  • April 2025
  • March 2025
  • February 2025
  • January 2025
  • December 2024
  • October 2023
  • September 2023
  • August 2023
  • July 2023
  • June 2023
  • May 2023
  • April 2023
  • March 2023
  • February 2023
  • January 2023

Categories

  • Uncategorized
© 2026 PlaneLocket's Cookbook | Powered by Minimalist Blog WordPress Theme